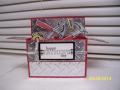
Another great card-in-a-box! This folds into our regular sized cards (4.25" x 5.5") and therefore, fits as usual, into our usual sized envelopes (I'm blanking out, are they called an A2 envelope?).
TIP: Draw out my directions on scratch paper to help you to visualize and use copy paper for your first attempt vs. wasting good card stock.
CARD STOCK: 4 1/4" x 11"
SCORE: Long side at: 1/2", 1 5/8", 5 3/4" and 6 7/8"
Quarter turn your card to the left and now:
SCORE: Short side at 2 3/4"
TAB: Cut off the smaller 1/2" wide rectangle.
TAB: Cut a slight angle into remaining tab up towards the scored line running across the c/s (this makes it easier to adhere to box later). You'll add Sticky Strip to the tab.
CUT: the three "shortest" score lines down to the 2 3/4" scored line running across the length of c/s. These will become the flaps at the top of the box.
FOLD: All score lines EXCEPT FOR the "backboard" piece.
If you fold that, it's not a big deal; it's just nicer if it can stand tall on it's own.
-- You can add c/s to either or both sides of that back panel for stability and to be able to write a greeting on the back, too.
FOLD: all remaining scored lines.
DIVIDING WALLS INSIDE: Measure across box front and add a 1/4" on each end of it (1/2" total). Score at a 1/4" from each end, adhere sticky strip to those 1/4" tabs and affix two of these inside your box making the dividing walls parallel to your box front and back.
Adhere your 3D items with SNAIL or glue dots to both the front and/or the backs of these inside dividing walls.
I'll meas. and edit details here, later.
My ribbon goes around the entire box keeping the front flap down for me. It would be nicer if it were more elastic for folding/mailing purposes but, mine is not.
IHTH! Have fun!
Thanks so much for looking!
Date: Wednesday, May 28, 2014 GMT Views: 4491
Favorited:24
Thank you soo much Leslie AND... for your wonderfully fun, descriptive line about your BIL and personal time you'll spend creating this too! I LOVED reading it; FUN!!! Thanks so much.
I will add the dimensions above and hope you can follow them! Thanks so much for stopping by to post (such a fun) comment! Have fun!
------------------------------ Donna Wicks, SU! Demonstrator www.donnawicks.stampinup.net
Click "Shop Now" for my on-line store!
Registered: March 20, 2008 Location: Hamilton, Ontario Canada Posts: 615
Mon, Aug 25, 2014 @ 10:04 PM
I JUST found this, oh my goodness--this is FANTASTIC!!! What an impressive job, I HAD to put this right into my favorites too. I'm SO GLAD it was a Favorites of the Week, I was feeling bad that I hadn't found it to put in my list then but others were smart enough to include it already--wonderful!!! What talent you have, WOW!!! I am so impressed!!! I find creating male cards to be such a challenge, thanks for sharing this amazing project!!!
Oh my goodness Joanne, Thank you so much for your raving comments, you have totally made my day! Thank you so very much! I'm thrilled you like this so well and have "favorited" it too. I wish you fun and success in making one for yourself, too! Sincere thanks with stamping hugs!!!
------------------------------ Donna Wicks, SU! Demonstrator www.donnawicks.stampinup.net
Click "Shop Now" for my on-line store!